How to Adjust Shift Linkage in an Automatic Transmission ?
Is your car transmission not responding in a timely manner? Do you hear buzzing, whining, or humming noise coming from your car that you haven’t heard before? If your answers to these questions are yes, then you need to make some adjustments on your car’s shift linkage.
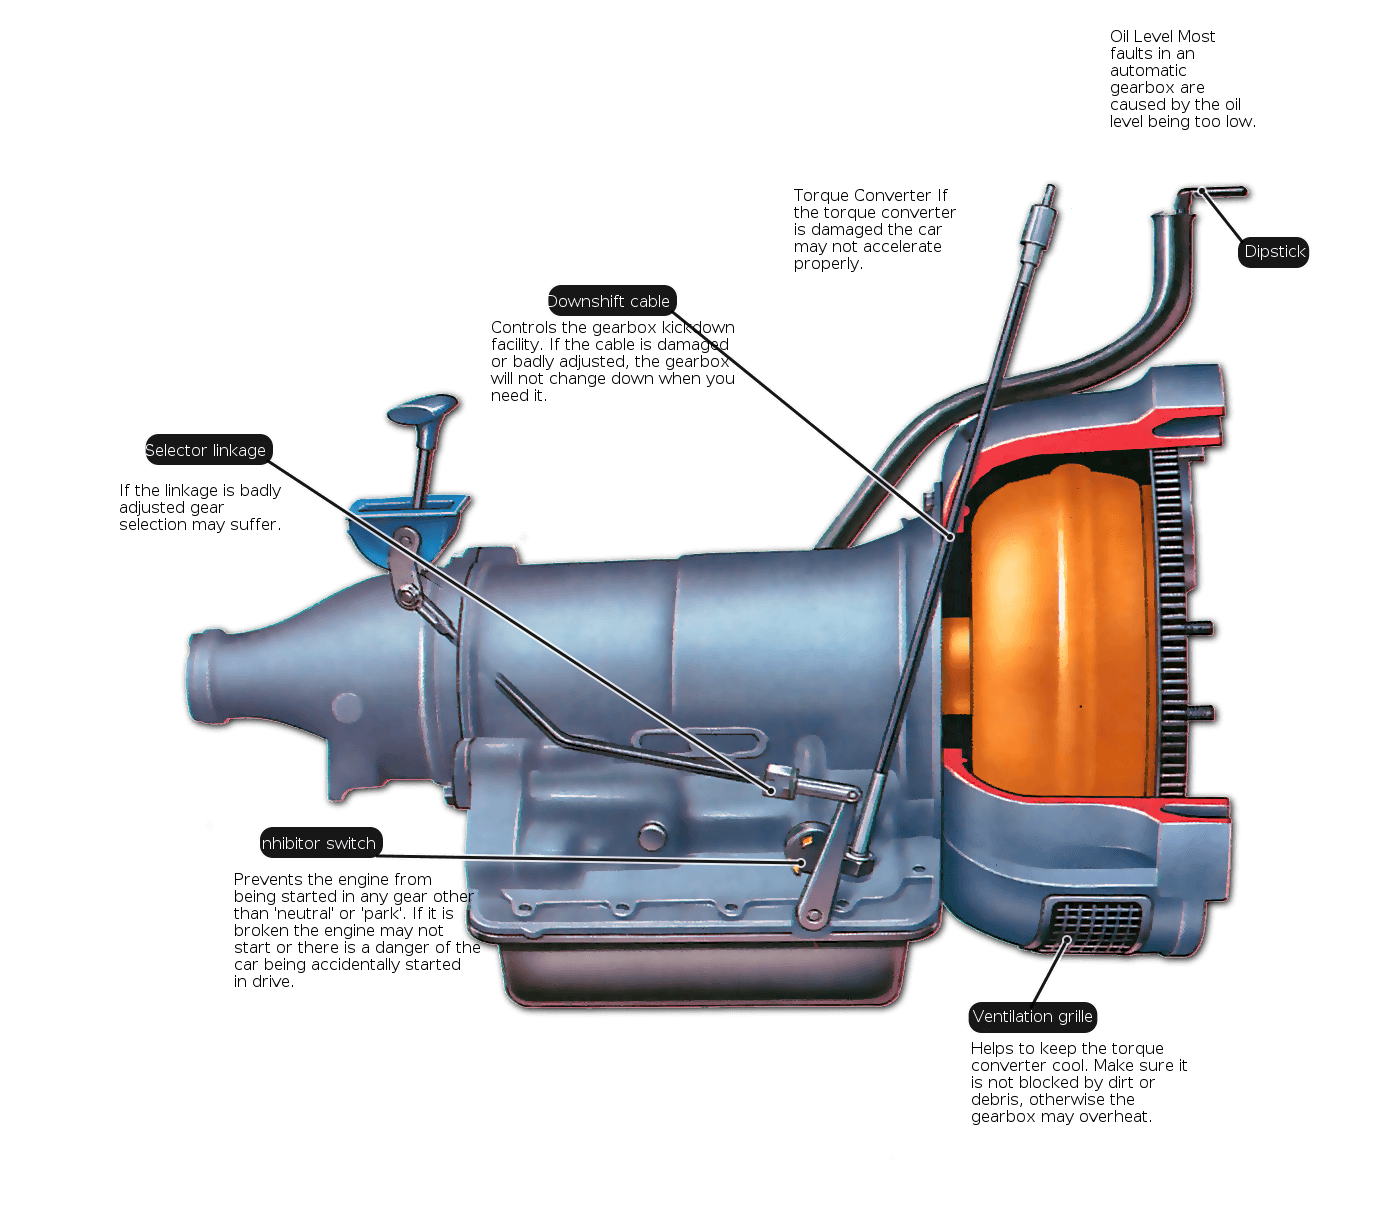
You need to identify the problem right away as it affects the performance of your car’s transmission. This how to adjust shift linkage in an automatic transmission post might help you solve the problems. This guideline is written for car owners of the 1985-95 model equipped with automatic transmissions. These cars have a mechanical shift linkage and lever assembly.
What is Shift Linkage Bushing?
Keeping the shift linkage and its components in the best condition are vital. This is a must if you want to have an efficient and smooth shifting always. Each time you have to service your transmission you need to check on the shift linkage bushing as well. The bushing is designed to keep the linkage components protected. It provides a bearing surface on some moving parts. In case it gets worn out or damaged, you will need to install a new one to make the shifter function at its best.
What You Need:
- Jackstands
- Nuts and Bolts
- Screwdriver
- Wrench
Step by Step Method on Adjusting Shift Linkage
All automatic transmissions have the same shift linkage. The shift linkage between the transmission and the cabin differs between vehicles, but the function is the same. There are a floor shift and a column shift that are both operated by a cable. Transmissions problems are usually resolved by adjusting shift linkage. Follow these simple and easy steps on adjusting the automatic transmissions shift linkage.
1. Length Adjustment
The steps of adjusting the length of the shift linkage are quite easy.
- Position the transmission in neutral and with the use of adjustment nuts that you will find in the middle of the shift tube set the transmission in neutral.
- While the nut still loose, screw in or out the adjustment threads until you achieve the right length.
- It is important that the shift tube is attuned, so the shift socket is right in the middle of the mounting hole when the shift tube is attached to the transaxle shaft with tightened set-bolt.
- After adjusting the length correctly, do not tighten the jam nut on the shift tube.
- Install the cockpit shifter mechanism. Bolt the shifter base on the little slope found at the mounting holes of the stick shift base, so the chassis shifter mounts with the adjustment bolts in the center. This will enable fine tuning if required, front to back.
- After installing the shifter base tightly, attune the shift tube clocking.
- Tighten the shift tube nut temporarily and find the first gear. Use the stick shift to position the car in gear. Since you have not yet clocked the shift tube, you will be in 1st gear or 3rd gear.
Note: Finding the first gear may take you several attempts of tightening and loosening the shift shaft adjustment nut, moving the shift tube clocking to find the first gear.
2. Clocking the Shift Shaft
After having the transaxle in first gear, you can now make the final adjustment, fine tune clocking of the shift shaft. This fine tuning enables your shifter to work properly, smoothly shifting gear. The adjustment requires patience, a helper and you may do a trial and error adjustment. Here’s how you do it.
- Loosen the shift shaft adjustment nut while the transaxle is in first gear.
- Push forward the stick shift lever and then to the left, like you are holding it firmly in first gear. You can ask someone to hold it firmly for you.
- As the shifter is still in the first gear position, strengthen the shift tube jam nuts using the two wrenches. The first wrench will keep the back part of the shift shaft in position. While the other will tighten the jam nut on the front part of the shaft.
Note: Be careful when holding the rear part of the shift tube as you might torque it when tightening the nut with the wrench. Make sure the back part of the shaft is held using a wrench to avoid torquing the rear tube.
3. Check the Gears
After completing the above steps, check all gears to make sure they can be found. In finding the gears do not force the shifter. You should find it easily with the clutch pushed in. In case all gears are found while the engine is off, you do the test reverse. Many shifters have a reverse lockout lever so accidental reverse shifts will not occur.
- Pull the reverse lockout and position the transmission in reverse and test. If you are on the reverse, you are good.
- Drive tests the car to check all the gear. If in case, you cannot find all gears, you need to check the steps above and repeat the process. You might do a trial and error.
- Only a few were able to get it right on their first try. You need to be patient when adjusting the shift linkage. Once you learn to do it, it will be easy for you next time.
Final Words
Proper shift linkage adjustment along with the transmission range sensor is important. Your vehicle will not start, or it may start in gear if the adjustment is not done properly. This might lead to the major safety hazard. It will also result in improper positioning of the transmission.
Improper adjustment of shift linkage may cause problems to transmission like: grinding, strange, and shaking noise transmission slippinglow-level fluid and leakage clutch problems burnt fluids and other sIf any of these signs are present, it is time for you to check on your shift linkage. Determine if it requires adjustment or replacement. Hope this how to adjust shift linkage in an automatic transmission helps you in solving your problems. If you find it helpful, feel free to share it with others who might be having the same problems.


