
How to Remove the Front Drive Shaft of Chevy 1500?
Need to repair your Chevy 1500 U-joints? We can help you on this. But, before that, there is one important thing you need to know. You should learn first how to remove the front drive shaft of your Chevy 1500.
What is a Drive Shaft?
The transfer of engine power from the transmission to the differential and to the wheels is not possible without a drive shaft. Some cars have one drive shaft and others have two. You will find U-joints at either end of the drive shaft. These serve as flex joints that enable the differential to move up if the car gets in contact with a bump.
The front driveshaft yoke connects the shaft to the transmission. The rear driveshaft flange connects the shaft to the differential. In an older model, connected to the differential is the rear U-joint. It does not need a rear flange.
Damaged U-joints is one reason you need to remove the front driveshaft. You need to remove it if it is blocking the other components that need repair.
Things you Need in Removing the Drive Shaft
- Drain pan
- Jack Stands
- Paint Pen
- Wrench Set
- Jack
- Mechanic’s gloves
- Safety glasses
- Screwdrivers
Safety Reminders
To prevent hurting yourself and/or damage any tools or equipment, you need to keep the following safety reminders in mind.
- Always follow the proper procedures and use the right tools and safety equipment
- Block any raised or moving device that may hurt a person working under a vehicle
- Assemble the components in the right way
- Never use damaged or worn-out components.
- Never work alone while under the vehicle
- Prepare everything you need
- Put on your safety gears like mechanic’s gloves and safety glasses
- Read the instructions
- Use the right and approved components in applications
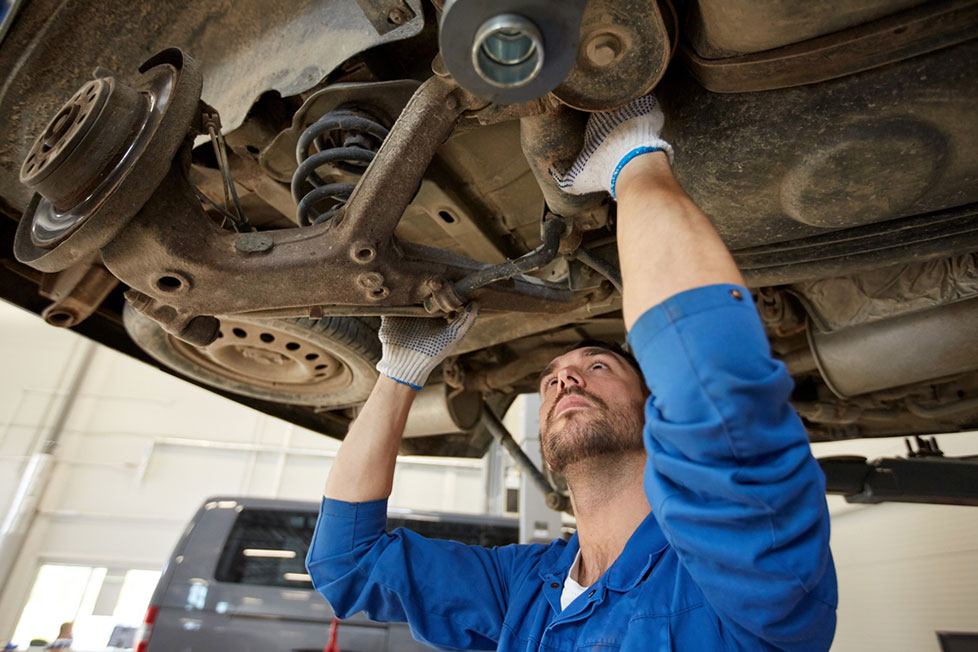
You need to protect your hands. There may be sharp objects in the drive shaft. This may cause serious cuts to fingers, hands, and knuckles.
Also, there will be a great amount of dirt, debris, and grime under your Chevy. Since you will work looking upward, some debris might fall into your eyes. You should not forget these safety reminders to avoid accidents and injuries.
Steps on Removing the Front Drive Shaft of Chevy 1500
Here are the simple steps on removing the front drive shaft:
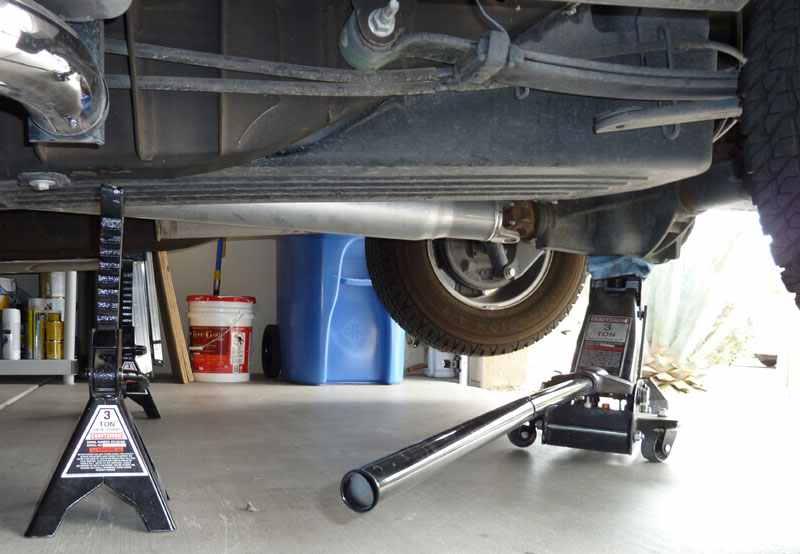
1. Raise your Chevy
Via https://chevroletforum.com/how-tos/a/chevrolet-silverado-2007-2013-how-to-jack-up-your-truck-389334
With a jack, raise the front of your Chevy. Position a set of jack stands under the frame and be careful in lowering the jack. Let the truck rests on the jack stands. Make sure that you have positioned the stands in the right location. It is important that the car is firmly secured. Remember you will be working underneath your Chevy.
Warning: You should not work under a vehicle with only the jack holding it. Always use jack stands.
2. Locate and Mark

Find the front drive shaft under your Chevy. It runs from the axle housing to the transfer case behind the engine.
Using the paint pen, mark the driveshaft orientation before you start. This will ensure that you will be reinstalling the shaft back to the same position. If you install the shaft in the different orientation it might cause a serious problem. The shaft might vibrate or wobble. This can damage the shaft, axle, transfer case and U-joints. Mark both ends of the shaft.
3. Remove the drive shaft bolt
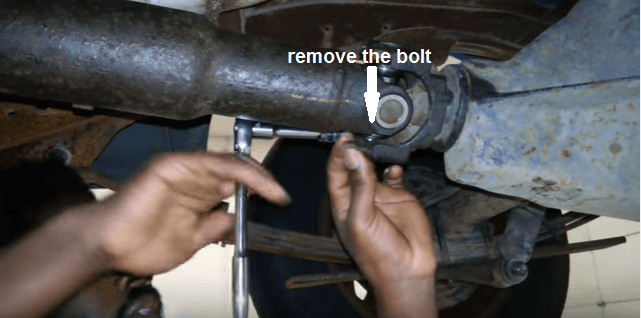
Position to the front of the shaft where it connects to the axle housing. Using a good quality wrench remove the four retaining bolts from the yoke. Keep in mind these bolts are very tight so be very careful. Some bolts have 12 point heads it needs a 13mm 12 point sockets to remove. These bolts have lock tight to prevent it from getting loose while on the move.
4. Remove from the Flange
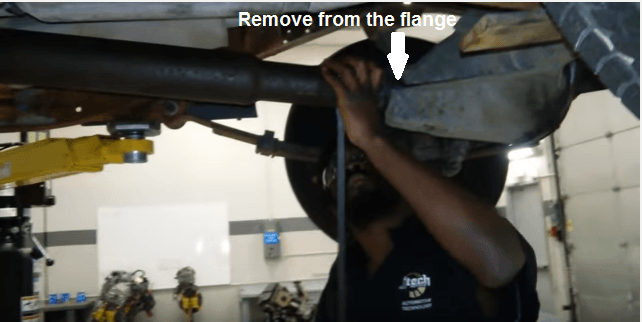
Go to the transfer case end of the Chevy drive shaft. Find the position of the four retaining bolts. Remove the bolts using the wrench and pull the shaft off the transfer case. Sometimes you need to rotate the shaft to remove all the bolts. Place the transfer case into neutral, this will allow the shaft to spin freely.
Carefully shock the drive shaft with a plastic hammer. If you strike the rear yoke it will loosen the shaft from the differential flange. Make sure you are holding the shaft firmly. The back half of the shaft will be free by this time.
5. Remove the Front Driveshaft
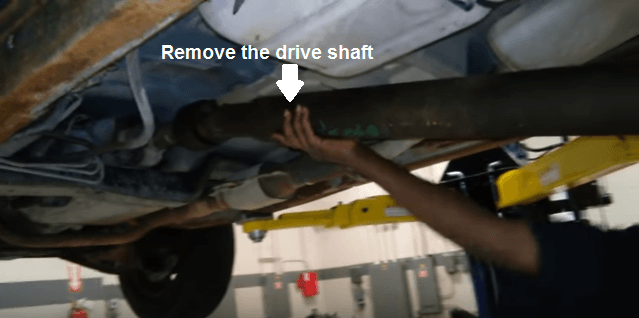
Remove the front drive shaft and perform the needed repairs. Make sure that you place the drive shaft in a safe place. To prevent any damage while out of the Chevy. Using both hands slide the drive shaft from the transfer case or transmission.
Warning: Prepare a fluid catch basin, sometimes a small amount of fluid will leak out.
This is the best time to replace the transmission tail housing seal, joints or do differential repairs. After completing the repair and the needed parts replacement, re-install the drive shaft. It is important that you return the drive shaft on the same orientation. If not, this might cause another problem.
Final Words
You don’t need an expert to remove the drive shaft of your car. Hiring a mechanic may cost you a lot. By following the above steps and keeping the safety measures in mind, you will not have any problem in completing the task. We hope you enjoy this how to remove the front drive shaft of Chevy 1500 guide. If you find this guide helpful to you, feel free to share it with others.
Relax after tiring working hours.
If you have trouble sleeping, choose a quick sleep guide to have the best energy the next day.